|
~ The BASICS ~ Briefly ~ Sorta-Kinda briefly .~
Step 1. Transfer the Design
You will need: *Tape *Soft pencil *Hard pencil *Tracing papeR *Carving Block optional ~ Ball-point pen
With a soft dark pencil, trace or draw your design on lightweight paper to fit the size of your carving rubber. Place the design, pencil side down against the plate. With a hard pencil, trace the same lines on the back of the design to transfer the soft lead onto the surface. Optional~ just run the pencil in very close lines back and forth vertically then horizontally then diagonally, as if you're taking a rubbing. You're actually giving a rubbing, heh. DO NOT let the paper shift on the rubber meanwhile or your rubbing will blur, wasting all that work. Lift the corner of the paper to see if the transfer is complete and when you are satisfied, move it out of the way. It's helpful at this point to use a ballpoint pen to go over the design and make it very clear. You may fill in the areas that will be cut away, or fill in the areas that will remain. Don't get your wires crossed - pick one or t'other and stick with it. My recommendation is to fill in the areas that will be cut away. The printed image is going to be whatever is left.
Only, like Ginger Rogers dancing with Fred Astaire, it will be doing the same thing only backwards. (...we are tempted to add, in high heels. But we won't.) Just pointing out here that your image printed will be the reverse of the image you see on the surface of the rubber. A mirror image.
Step 2. Cut the image:
You will need: * block from step 1, with design drawn * Carving tools!
We use a#1 V-gouge plus a broader blade (exacto knife or #5 U-gouge) for cleaning away backgrounds. Feel free to experiment, though; it's like whittling, and you may already be comfortable with another small sharp tool.
If you are using a knife, slide it at an angle along the OUTSIDE edge of the design line, tilted away. This will create a bevel like a seashore slanted away from the island of your design. If you cut under the image it will be difficult to apply even pressure when stamping and this may cause an imperfect image. Next, take the knife out a bit from that line, and cut along the same line only at an opposing angle, creating a v-shaped canyon cut. Continue to clean away material using these angled cut lines until everything that's not your stamp design is gone.
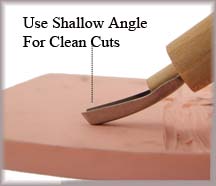
If you are using a gouge, it cuts both sides of the canyon at once. Keep your angle of approach low. "Shallow Cuts for Clean Angles", as shown in the image below. This increases control and minimizes the skittering. *Sk k k itt t ering/bad d dd* = ueven cuts = uneven prints. Try to cut to a similar depth each time.
At some point you will need to test to to see if you are finished cutting away enough material or to make sure you are cutting away enough depth for a clean print. Just test with a quick stamp on scrap paper. Hopefully this is not where you discover that your lettering is mirror-imaged! If it is, you can always refer to Leonardo's notebooks. Claim artistic license. Read it with mirrors.
Continue cutting until you are happy with the design, test stamping as you go.
*TIPS ~ 1. Try practicing on a potato. Potatoes won't last as long as rubber and they are rather different in texture and density but they are similar enough, offering resiliency and resistance, so you can experience holding the tool for efficient angle cuts, and keeping the pressure steady. The 'humble spud also has the advantage of being an inexpensive, non-threatening staple readily available in many households. AND you can do some really cool prints.
2. Gently brush or blow any crumbs away as you work. 'Gently' is the key word here - if you accidentally pop off a piece of rubber, it is Very Difficult to replace. "Way-too-hard" is another way to describe the rigors of fixing it.
Step 3. Print your image:
You will need: *Ink *Inking Plate and Brayer *Print Baren /Old Serving spoon or wide flat top of jar for flat press transfer
*TIP - Stamp pads work as inking plates for small designs *Paper. *Paper. *More Paper
Optional / Helpful: Spray water bottle (if using acrylic print ink) Mounting block (if stamp is thin)
Attach your carving to a mounting block if you choose. A strip of doublestick tape should hold it through most printing action.
Roll out your ink on the plate, then onto your stamp. The first inking will tend to disappear into the carving; tamp it out on scrap until it prints clearly, then begin your real run. Place inked carving in position, do not let it wiggle. Press gently and firmly over entire surface to ensure full contact with your print material. *Helpful TIP: Printing over a pad of newspring or a sheet of foam gives better results than a hard surface.
Step 4. Clean Your Carving:
You will need: Mild soap for cleaning water-based inks, or a gentle solvent for oil-based inks - we like veg. or mineral oil,
followed by soap & water. Wash with soft brush or sponge, and rinse the soap or solvent off well.
TIP : have some rags handy to clean up the area and dry your carving with a lint-free cloth before putting it away
|